Dutch lap siding is a horizontal exterior cladding profile characterized by a concave face and a notched lower edge that creates a pronounced shadow line; this profile produces depth and crisp reveal while shedding water effectively. Homeowners choose Dutch lap siding for its blend of architectural detail and weather-shedding performance, especially when executed in durable materials like Western or Eastern Red Cedar, fiber cement, or modern vinyl. This article explains what Dutch lap siding is, how it differs from other lap profiles, which materials are commonly used and why, the practical benefits for curb appeal and durability, step-by-step installation guidance, and material-specific maintenance protocols. Readers will gain actionable decision criteria for choosing wood versus synthetic options, a tool-and-time checklist for installation, and maintenance schedules to maximize lifespan. Throughout the guide, we emphasize wood-first perspectives, including Eastern Red Cedar considerations and local climate guidance relevant to Mountain Home, Arkansas, while keeping practical comparisons to vinyl and fiber cement. By the end, you’ll understand profile differences, lifecycle trade-offs, and when to DIY versus hire professionals.
What is Dutch Lap Siding and How Does It Differ from Other Siding Types?
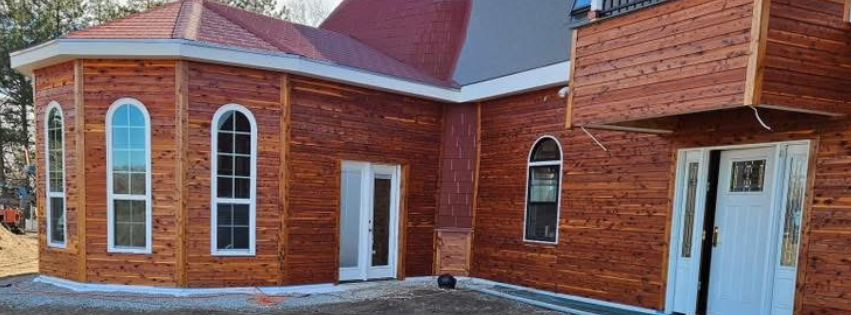
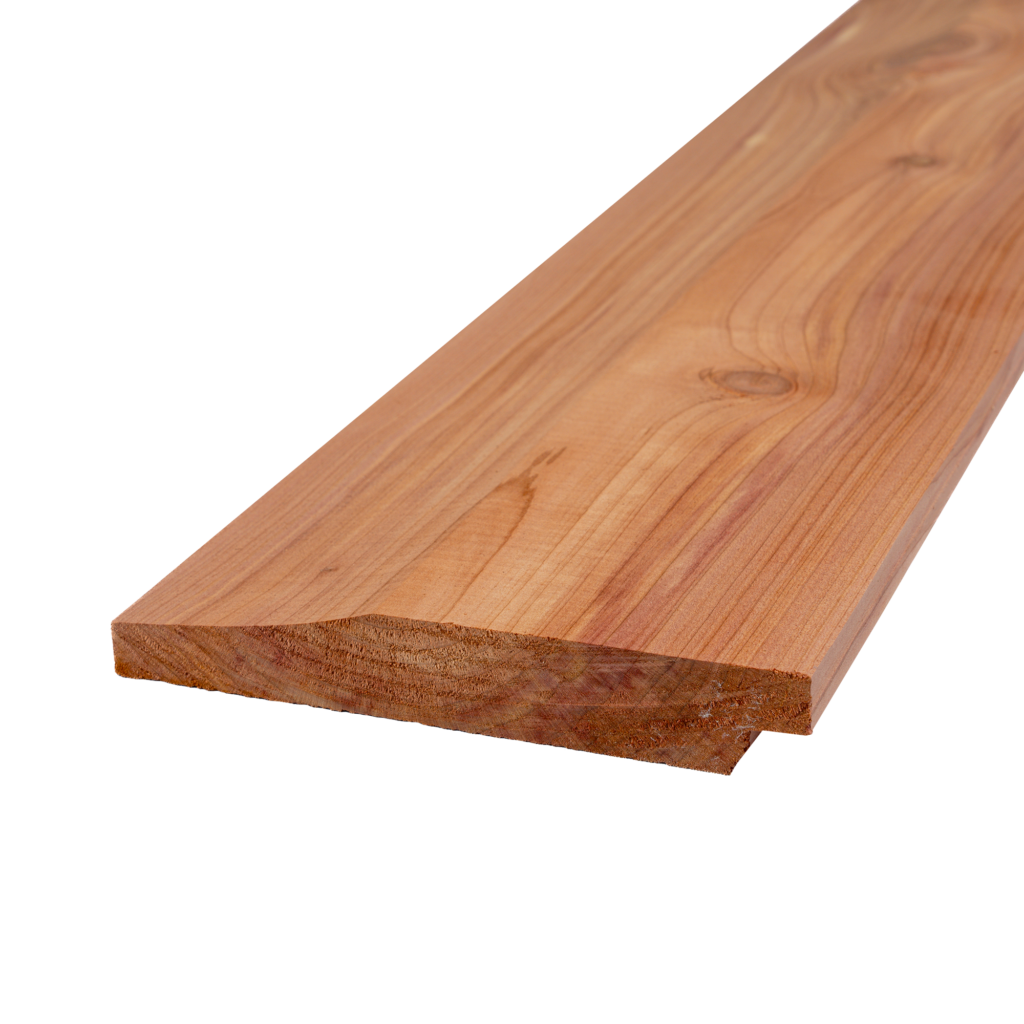
Dutch lap siding is a shaped horizontal lap profile with a slightly concave front face and a notched lower edge that interlocks visually to form a crisp shadow line and reveal. This profile reduces direct rain driving into joints by channeling water away from the overlap, so the mechanism—profile geometry—directly improves weather performance and curb appeal. The result is an exterior cladding that reads as high-detail, dimensional, and historically sympathetic to Colonial, Craftsman, and vernacular styles.
Understanding this profile explains why Dutch lap is sometimes called cove lap or German lap and how it contrasts with flat-faced clapboard and shiplap profiles. The next section describes the unique visible features that produce the shadow line and how those features guide material selection.
What Are the Unique Features of Dutch Lap Siding?
Dutch lap’s unique features include a concave face and a notched bottom edge that together form a narrow reveal or shadow line, producing perceived depth on the façade. This shadow line is a visual mechanism that accentuates horizontal courses and architectural proportions while hiding minor installation irregularities, so the aesthetic benefit arises directly from the profile geometry. The profile also alters water flow at each course, guiding moisture outward and helping reduce capillary action between boards. These design features make Dutch lap well suited to homes where pronounced horizontal detail and a traditional look are desired, bridging historic appearance with modern protective performance.
How Does Dutch Lap Siding Compare to Traditional Lap and Clapboard Siding?
Dutch lap differs from traditional lap and clapboard primarily in face curvature and edge detail: clapboard typically has a flat or tapered face, while Dutch lap adds a concave or cove profile and a notched lower edge. This difference creates a stronger shadow line and slightly greater water-shedding advantage for Dutch lap, so the trade-off is visual refinement versus slightly higher milling complexity and potentially greater labor precision during installation. Clapboard tends to be simpler to produce and install, lowering material and labor costs, while Dutch lap often commands a premium for the profile and finishing.
In practice, the choice balances desired architectural expression against budget and maintenance expectations, and the next section explores material choices that pair with the Dutch lap profile.
How Does Dutch Lap Siding Differ from Other Siding?

Dutch lap siding is manufactured in several materials—wood (including Eastern Red Cedar), vinyl, fiber cement, and steel—each delivering different durability, maintenance, cost, and appearance characteristics. The mechanism behind these differences is material properties: cellular structure and natural oils in wood provide insulation and aesthetics, polymer chemistry in vinyl provides low maintenance, and cementitious composites in fiber cement provide impact resistance and fire performance. The result is that homeowners can select based on priorities like natural grain and longevity for wood, minimal upkeep for vinyl, or durability for fiber cement. Below is a concise comparative table to summarize typical attributes and guide choices.
| Material | Attribute | Value |
|---|---|---|
| Wood (Eastern Red Cedar) | Appearance & natural durability | Warm grain, natural rot/pest resistance, good insulation |
| Vinyl | Maintenance & cost | Low maintenance, lower upfront cost, color fade over time |
| Fiber Cement | Durability & fire resistance | High impact resistance, stable in heat, requires painting |
| Steel | Strength & longevity | Excellent durability, potential for corrosion in coastal zones |
This table highlights the primary decision axes—appearance, upkeep, and resilience—and helps homeowners match material to priorities. The following subsections examine wood characteristics and synthetic comparisons.
What Are the Benefits and Characteristics of Wood Dutch Lap Siding?
Wood Dutch lap siding offers a combination of natural grain aesthetics, insulating cellular structure, and, in certain species, natural resistance to decay and pests; these properties produce warm, textured exteriors that age gracefully when maintained. Mechanically, wood holds finish well and can be milled precisely to the concave Dutch lap profile, preserving the shadow line and milling detail that define the look. Eastern Red Cedar, in particular, combines attractive grain with natural aromatic oils that help resist rot and insects, making it a preferred choice for wood-first applications. The practical impact is a siding that blends insulation value with high curb appeal, though homeowners must commit to staining or painting cycles to protect against UV and moisture.
(Integration note: Mountain Milling Co. produces finished lumber and siding including Dutch lap profiles and works with Eastern Red Cedar; their wood products suit homeowners pursuing natural, durable wood Dutch lap installations.)
How Do Vinyl and Fiber Cement Dutch Lap Siding Compare in Durability and Maintenance?
Vinyl Dutch lap siding prioritizes low maintenance and ease of cleaning, relying on polymer stability to resist rot and insect damage while offering budget-friendly installation; however, vinyl can expand/contract with temperature and may fade over long exposure. Fiber cement Dutch lap siding achieves superior fire resistance and dimensional stability, resisting impact and rot while holding paint well, although it is heavier and requires cutting with carbide tools and proper fasteners. Lifespan estimates typically range from 20–40+ years for high-quality fiber cement, 20–30 years for premium vinyl depending on climate, and 30+ years for well-maintained cedar—these timelines vary with maintenance and exposure. The decision therefore hinges on whether the homeowner values natural aesthetics and insulation (wood), minimal upkeep (vinyl), or fire/impact resistance (fiber cement).
Vinyl and fiber cement represent distinct maintenance philosophies; choose based on climate exposure and desired lifecycle.
- Vinyl Pros: Low maintenance, easy cleaning, cost-effective.
- Vinyl Cons: Color fade, thermal movement, limited authentic wood appearance.
- FiberCementPros: Fire- and impact-resistant, paint-stable, long life.
- FiberCementCons: Heavier, higher installation labor, requires repainting over decades.
- WoodPros: Authentic grain, insulation, natural resistance (species-dependent).
- WoodCons: Regular staining/painting, moisture and pest management required.
What Are the Benefits of Choosing Dutch Lap Siding for Your Home?
Dutch lap siding delivers pronounced aesthetic depth, reliable water-shedding geometry, and flexible material options that can improve thermal performance and resale value when specified correctly. The mechanism behind these benefits is the profile design: the concave face and reveal create a shadow line that enhances perceived detail, while overlapping courses shed water efficiently. Practically, this manifests as an exterior that elevates curb appeal, reduces visible joints, and can be matched to historic or contemporary styles. Below is a structured table showing benefit categories, how they manifest, and practical homeowner impact to help translate abstract advantages into real decisions.
| Benefit Category | How It Manifests | Practical Impact |
|---|---|---|
| Aesthetic Detail | Shadow line and reveal depth | Boosted curb appeal and perceived craftsmanship |
| Weather Performance | Overlap geometry sheds water | Reduced water intrusion risk and siding longevity |
| Energy & Insulation | Material-dependent thermal properties | Lower envelope heat loss when combined with insulation |
| Longevity & Repairability | Material and finish choices influence life | Predictable maintenance cycles and repair options |
This benefit table shows how profile and material choices convert into homeowner value. The following lists exemplify aesthetic and performance advantages with practical implications.
- Enhanced curb appeal: Dutch lap’s shadow line increases architectural richness and resale attractiveness.
- Improved water management: Profile geometry helps divert moisture away from vulnerable gaps.
- Material flexibility: Available in wood, vinyl, fiber cement, and steel, allowing cost and performance tailoring.
- Repair-friendly courses: Damaged boards can be replaced course-by-course without full re-cladding.
How Does Dutch Lap Siding Enhance Aesthetic Appeal and Architectural Style?
The Dutch lap profile complements Colonial, Craftsman, and Victorian styles by reinforcing horizontal proportions and adding shadowed detail that reads as crafted trim rather than mass-produced cladding. This aesthetic mechanism—shadow generation—changes how light and shadow articulate facades, creating perceived texture and depth that photograph and age well. For renovation projects, Dutch lap can be paired with contrasting trim, corner posts, and window surrounds to amplify period-accurate detailing; for new builds, it provides a ready-made stylistic cue that signals traditional character. Designers and homeowners choose Dutch lap when the goal is visible coursing and crisp horizontality rather than flat, modern planar façades.
What Are the Durability, Weather Resistance, and Energy Efficiency Advantages?
Durability and weather resistance depend on material selection and finishing systems: wood needs periodic sealing to resist UV and moisture, fiber cement resists rot and fire, and vinyl resists biological threats but can be thermally sensitive. The underlying mechanisms—material chemistry and profile geometry—determine resistance to moisture, UV, pests, and impact. Energy efficiency gains are modest at the cladding level but significant when Dutch lap is combined with proper sheathing and cavity or continuous insulation; wood offers better inherent thermal performance than thin vinyl panels, but overall efficiency depends on the whole wall assembly. Quantitatively, expect lifespan ranges of roughly 20–40+ years depending on material and maintenance, with regular inspections and finish renewal improving outcomes.
How Do You Install Dutch Lap Siding? Step-by-Step Guide and Tips

Installing Dutch lap siding requires precise layout, correct flashing, proper substrate preparation, and attention to fastener placement so the profile interlocks visually while remaining free to expand. The installation mechanism relies on accurate course spacing and nailing at prescribed zones to preserve the shadow line and accommodate seasonal movement; errors can flatten the reveal or create buckles. This step-by-step guide outlines prep, layout, installation sequence, and common corrections so DIYers and contractors can gauge time and skill. After the numbered steps is a tools checklist and a decision guide for DIY versus professional installation.
Follow these numbered steps for a standard Dutch lap installation.
- Prepare substrate: Inspect sheathing, install housewrap and flashing, and ensure a level starter course.
- Layout courses: Mark reveals and panel heights so the shadow line aligns consistently across elevations.
- Install starter and first course: Fasten starter strip level, then install first Dutch lap board, checking reveal.
- Nail and space: Use recommended nails at the top nailing flange, leave slight gaps for thermal movement.
- Trim and finish: Integrate corner posts, J-channel at openings, and apply caulk where needed to flashing transitions.
These steps prioritize profile preservation and water management; next is a task-by-task EAV table breaking down tools, materials, and typical time/skill estimates.
| Task | Tools/Materials Needed | Typical Time/Skill Level |
|---|---|---|
| Substrate prep & flashing | Housewrap, flashing tape, utility knife | 2–4 hours, intermediate |
| Layout & starter course | Chalk line, level, starter strip | 1–2 hours, basic carpentry |
| Installing courses | Circular saw, nail gun or hammer, siding nails | 4–12 hours, intermediate |
| Trim and sealing | J-channel, corner posts, exterior caulk | 2–4 hours, basic finish carpentry |
What Tools and Materials Are Needed for Dutch Lap Siding Installation?
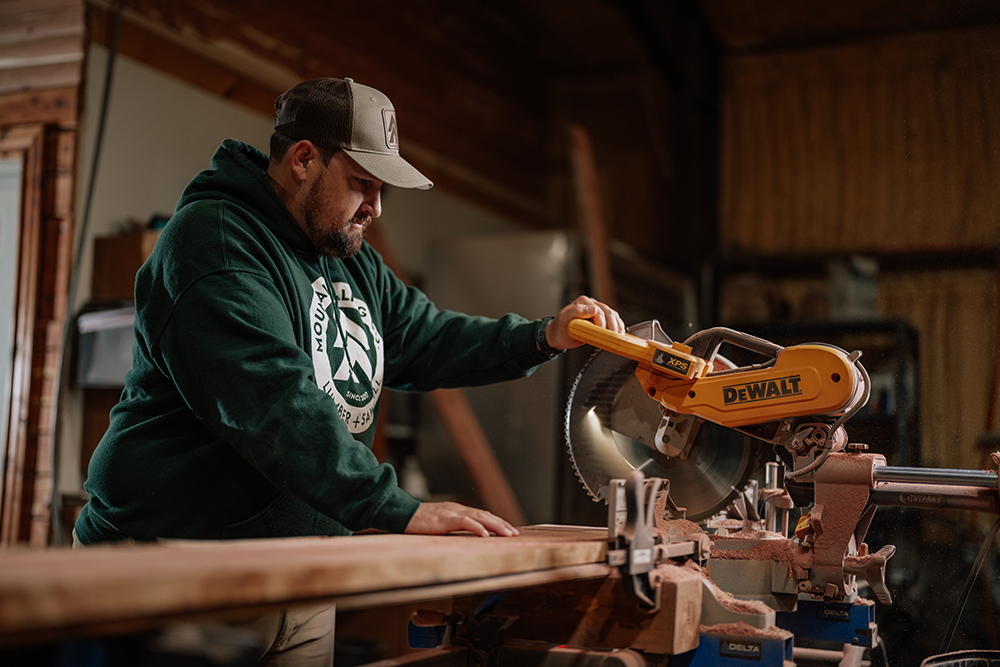
A successful install requires a mix of layout tools, cutting tools, appropriate fasteners, and safety gear: chalk line, level, circular or miter saw (carbide blade for fiber cement), tape measure, siding nails or stainless fasteners for cedar, corrosion-resistant screws for fiber cement, housewrap and flashing, and personal protective equipment. Specialty items include a siding gauge for consistent reveals and a brake or bending tools if using metal trims; fiber cement cutting needs dust control and respirators. Proper tool selection reduces installation time and prevents damage to the profile, while using the right fasteners protects warranties and ensures movement accommodation. The following list summarizes essential and optional items.
- Essential: level, chalk line, circular saw, tape measure, nail gun or hammer, siding nails, housewrap.
- Optional/Specialty: siding gauge, fiber cement blade, respirator, metal brake.
- Safety: eye protection, gloves, dust mask or respirator for cement dust.
These items support accurate layout and safe handling; the next subsection helps decide when to DIY.
When Should You Choose DIY Installation vs. Professional Services?
DIY installation suits homeowners with solid carpentry experience, access to proper tools, and projects limited to straightforward elevations without complex trim or height work; smaller homes and wood siding are commonly feasible DIY choices. Professional installation is recommended when working with heavy or brittle materials like fiber cement, when elevations require scaffolding, or when permits and warranties demand certified installers—contractors also streamline flashing integration and complex details. Consider time investment, local code requirements, and the cost of renting specialized tools; hiring professionals often reduces risk of installation errors that compromise the shadow line or water management. Use the decision checklist below to weigh your options.
- Choose DIY if: You have carpentry experience, appropriate tools, and simple façades.
- Choose pros if: You’re using fiber cement, have tall walls, complex trim, or want warranty-backed work.
- Consider hybrid: DIY prep with professional finishing for tricky trims and flashing.
How Do You Maintain and Care for Dutch Lap Siding to Ensure Longevity?
Maintenance extends Dutch lap siding lifespan through inspection, finishing, and targeted repairs that address the profile’s exposure points such as bottom edges and flashing interfaces. The maintenance mechanism is recurring protection—cleaning, seal renewal, and joint inspection—that prevents moisture ingress, UV breakdown, and biological growth. Material-specific routines differ: wood needs staining/painting, vinyl needs occasional washing, and fiber cement needs periodic repainting and caulk checks. Below is a seasonal maintenance checklist followed by material-specific guidance and a short product note about available finishes.
- Spring: Inspect for winter damage, clean gutters, and check flashing.
- Summer: Wash siding to remove pollen and debris; inspect sealant at openings.
- Fall: Clear leaves, verify grading and drainage, re-caulk where needed.
- Every 3–7 years: Refinish wood or repaint fiber cement depending on exposure.
This checklist keeps maintenance manageable; next we cover wood-specific tasks and practical product recommendations.
(Integration note: Mountain Milling Co. offers stains and sealers and a range of siding finishes appropriate for Eastern Red Cedar, enabling homeowners to select compatible protective products for wood Dutch lap installations.)
What Are the Specific Maintenance Tips for Wood Dutch Lap Siding?
Wood Dutch lap requires regular inspection for checking finish integrity, end-grain sealing, and fastener condition; expect to re-stain or repaint every 3–7 years depending on exposure and finish type. Begin by washing mildew and dirt with a gentle detergent, then inspect for raised or splitting grain at joints; sand problem areas, apply a penetrating oil-based stain or exterior-grade paint, and seal end-grain to prevent moisture wicking. Maintain proper roof and gutter function to reduce splash-back and ensure siding bottom edges remain clear of soil contact; ventilation behind siding and proper flashing reduce rot risk. Using recommended stains and sealers tailored for Eastern Red Cedar preserves natural oils and improves UV and moisture resistance.
How Does Maintenance Differ for Vinyl and Fiber Cement Dutch Lap Siding?
Vinyl maintenance is largely cleaning: periodic washing with a mild detergent and garden hose removes dirt and prevents staining; inspect for loose panels and resecure fasteners if thermal movement has shifted courses. Fiber cement requires occasional repainting—typically every 10–15 years depending on paint system—and monitoring for cracked boards from impact; repair procedures include replacing affected boards and reapplying caulk around penetrations. Both materials require inspection of flashing, caulking, and trim at least annually to prevent water infiltration. Choosing low-maintenance materials reduces routine work but does not eliminate the need for seasonal inspections and timely repairs.
Why Choose Mountain Milling Co. for Your Wood Dutch Lap Siding Needs?
Mountain Milling Co. is a lumber company based in Mountain Home, Arkansas, that specializes in finished lumber, moulding and trim, and siding including Dutch Lap Siding with a wood-first focus emphasizing Eastern Red Cedar. Their product offering aligns with homeowners seeking natural, durable building materials and precision-milled profiles; this expertise supports accurate Dutch lap milling, consistent reveals, and appropriate finish preparation for cedar. Mountain Milling Co. supplies related wood products—tongue and groove, moulding, trim, posts and beams—and provides stains and sealers that pair with cedar to extend service life in humid climates.
What Makes Mountain Milling Co.’s Eastern Red Cedar Dutch Lap Siding Unique?
Mountain Milling Co.’s Eastern Red Cedar offerings emphasize species-appropriate milling, finishing options, and availability of complementary trim and moulding to maintain consistent aesthetics and performance across the façade. Eastern Red Cedar’s natural oils and grain produce inherent resistance to decay and insect pressure, and finished lumber from a supplier specializing in this species helps preserve those properties by recommending suitable stains and end-grain treatments. Mountain Milling Co. markets finished siding and associated wood products appropriate for homeowners desiring an authentic wood exterior and natural durability. Their regional presence in Mountain Home, Arkansas, informs product selection and recommended maintenance schedules for local conditions.
How Can Local Arkansas Climate Influence Your Choice of Dutch Lap Siding?
Mountain Home, Arkansas experiences humidity, precipitation, and seasonal temperature swings that increase moisture exposure and fungal risk for cladding; these climate factors mean material choice and finish selection are critical to long-term performance. For wood Dutch lap siding, choose Eastern Red Cedar and apply penetrating stains or sealers to protect against moisture and UV—reapplication cycles may be on the shorter end of typical ranges in humid climates. For low-maintenance alternatives, fiber cement can mitigate rot risk but requires proper flashing and paint maintenance; vinyl reduces biological risk but must be installed to accommodate thermal movement. Accounting for drainage, ventilation, and regular inspection in Arkansas will significantly prolong siding life and reduce repair frequency.

